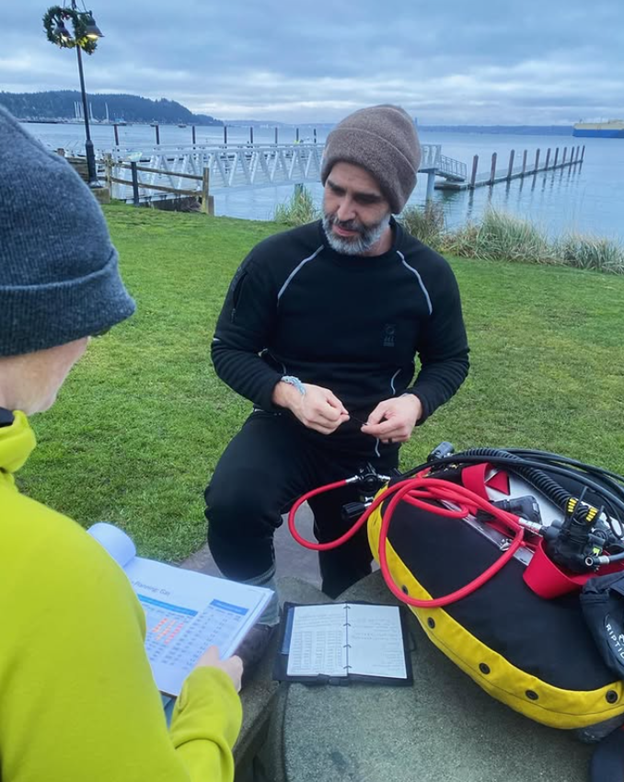
Dive Against Debris – April 2019

Katie, from Algalita, sorting through marine debris.

On Sunday, April 7, 2019 we hosted our monthly Dive Against Debris on Bayshore Beach in Long Beach, CA. During this event, we had 8 divers collect over 230 pieces of debris weighing in at over 15 pounds. The divers spent an average of 50 minutes under water.

Jade Scuba Adventures has “Adopted” Bayshore Beach as a dive site by agreeing to do at least one dive per month at this location to collect, sort, and report debris data at this location. Though this Adopt a Dive Site program through Project Aware, Jade Scuba has been able to compile Data on how much and what types of debris are found underwater. The first reporting at this dive site took place in September of 2018. Since then, 40 Scuba Divers have volunteered over 31 hours of dive time collecting over 1800 pieces of debris, mostly inside the swim zone at depths less than 18 feet.

You have probably heard that straws are an issue in the ocean and they injure marine life. Did you know that approximately 20% of the debris collected at Bayshore Beach has been plastic straws? They are found frequently in the shallower waters, about 5 to 8 feet deep. They are most likely left on the beach and then blow into the water and sink.

Our Dive Against Debris events also include beach cleanup. Ocean Conservancy’s Clean Swell app is how we record the surface debris. Over 7500 pieces of debris have been collected on this beach including over 3500 plastic/foam fragments and 1900 cigarette butts and cigar tips.

You ask how you, as one person can help this problem of marine debris. Participate! Do a beach cleanup- sort and report what you find. Doing the cleanup is half the battle. The other half is having the data to backup the real problem and being able to use it to affect policy change at the local level.

The data that has been collected over the last 6 months at this specific location is being used in Long Beach to affect change. It is being taken to multiple businesses and community leaders to show the problem and recommend changes. One small change that is being affected is reducing/removing the use of plastic sandbag anchors for different events in the swim area and requiring event hosts to use reusable options. Citizen science programs such as Dive Against Debris are extremely valuable tools to affect change by recording and compiling data.

Ocean Sanctuaries out of San Diego , Project Aware out of Rancho Santa Margarita, and Algalita out of Long Beach are key non-profits that assist in these projects locally.

Friday Factoid: Pacific Seahorse

All creatures are unique. What special marine creature did you find on your last scuba dive? The one in the above photo is Daphne, a Pacific Seahorse Hippocampus Ingens. She’s also sometime referred to as a Giant Seahorse. This is because Pacific Seahorses are the largest seahorses in the world. It’s hard to tell from the photo, but Daphne currently measures in at 9.5 inches long. Kenny, the largest in the colony, is a whopping 11.75 inches!

This colony of seahorses is cared for by Roger Hanson and his assistants, Jade Scuba Adventures. The colony has 2 mating pairs of seahorses. Daphne is approximately 38 months old, making her the oldest seahorse in the colony. The Pacific Seahorse has a life expectancy of 60 months. These seahorses are currently listed as vulnerable on the IUCN Red List of Threatened Species. If you find one on your scuba dive, you’re incredibly lucky! We recommend you don’t disturb them and keep their location secret except from a trusted organization working to take care of the seahorses and get them off the threatened species list.

Did you know that the female seahorse impregnates the male? That’s right! The male seahorse carries the eggs until giving live birth to hundreds of baby seahorses commonly referred to as Fry. Ladies, doesn’t that sound nice?

Data above was pulled from personal research with the seahorse colony and marinebio.org. Photo courtesy of Jade Scuba Adventures. Jade Scuba Adventures is a Scuba Diving Training, Gear, and Travel company based out of Huntington Beach, Orange County, California. We’re centrally located close to Seal Beach, Westminster, Santa Ana, Costa Mesa, Newport Beach, Long Beach. We love scuba diving out of Laguna Beach, Redondo Beach, and the Channel Islands, especially Catalina Island. Come out and dive with us!

Drysuit vs Wetsuit


DDC35245-2222-492C-8A8E-D3B9126F3029

Most of you divers out there reading this probably learned how to dive in a wetsuit.  It’s pretty much standard in most places.  You learn about the different types of exposure protections in Open Water: Skin Suit, Wetsuit, and Drysuit.  Yet, you may not have been given the choice between them or even realized you had a choice (yes, you CAN learn Open Water in a drysuit).  You may have seen other long time divers or even your instructor in a drysuit and wondered, why?

I learned how to dive in a wetsuit.  I had about 100 dives before I made the decision to purchase a drysuit in the middle of summer here in beautiful Southern California.  Yes, you heard that right.  The surface temperature on one of my dives in late June was 71F, but the thermocline at 80 feet deep was 48F.  Brrrrrrr!  That’s when I made the switch and it was the best decision I ever made, second only to deciding to learn to dive in the first place.  I’ve been in my drysuit for more than a year now and over 100 dives, so I figure it’s time to talk about the differences for those of you who might be considering making the switch.


The Differences

150A318E-F57B-4778-B351-0B2B8CAD0489

Warmth

Probably the biggest and most important difference is warmth.  Scuba Diving year round in Southern California can get cold.  Really cold.  During those winter months in a wetsuit, remaining gas and NDLs (No Decompression Limits) are not the limiting factors for dive time.  It’s body warmth.  I went to dive the Yukon wreck off a San Diego boat charter in January in my wetsuit.  By the end of the second dive, I was uncontrollably shivering and had to scrap the third dive-symptoms of hypothermia.

Water steals our body heat 20x faster than air.  20x!  Wetsuits work by trapping water against your body (when they’re fitted properly anyway).  Your body warms that water up and the water mostly stays there.  There’s some exchange with more of the surrounding cold water, but not as much as diving in a swimsuit or skin suit.  That’s still a lot of body heat being lost.  The wetsuits also provide some insulation based on how thick they are (3mm, 5mm, 7mm, etc.).  However, wetsuits compress as you get dive deeper.  The deeper you go, the thinner your insulation gets. Don’t forget that in most dive locations, the water temperature drops as you dive deeper. Thermoclines can be very noticeable visibily or by temperature gradient. With these thermoclines, you end up chilly .  You can also buy a wetsuit with high quality semi-dry seals, like the Fourth Element wetsuits (which are also higher quality neoprene requiring less lead) or a wetsuit lined with insulating material, like the Pinnacle merino wool lined wetsuit.

Drysuits work by keeping you dry.  The suit has seals at the wrists and neck and a zipper in the front or back to don it.  It traps air inside it which you adjust by way of a low pressure inflator connected to your regulator and a vent in the left shoulder.  You also wear wool, fleece, or down undergarments based on how cold the water is expected to be.  Since there’s no water contacting most of your body, you maintain your body temperature significantly better than a wetsuit.  It’s just like having a thick coat on during a colder day.  You stay nice and warm.  I can’t tell you how many times I’ve heard some local wetsuit divers talk about how they don’t need a drysuit cause they can still get 20-30 minute dives before they’re too cold.  I usually hear this after I finish a 90 minute dive AND am still comfortably warm.

Since warmth is mostly decided on what undergarments you wear, a drysuit can be used in any environment that requires anything more than a swim suit, from ice diving to tropical waters.  All you change is hood, gloves, and undergarments.  As an added bonus, in the summer months I don’t need anything besides my thin, fleece pajamas.


Donning and DoffingA26755B6-9EF3-44F7-83D1-57D129B233FF

Let’s face it, nobody enjoys putting on a wetsuit.  If it fits properly, it’s snug.  If you’re wet or sweaty, it’ll stick to you and make it more difficult.  This can be reduced by investing in a skin suit, wetsuit donning spray, or a wetsuit that comes with easy don lining.

A drysuit is designed to be loose on you (but not too loose or overly large!) so you have room for your base layers and air.  In general, it is much easier to don and doff.  It has seals at the wrist and neck that take a little practice to learn how to put on and take off properly.  If you yank on them too hard, you can tear them.  Then your drysuit won’t be dry until you replace the seal.  All you need to do is work it on by running your finger around inside the seal to work it down your hand to your wrist (hard to explain, easy to show).  This is one of those little things that makes drysuit training valuable.  Once you get the hang of it, a drysuit is very easy to put on and take off.


DCIM100MEDIA

Buoyancy

As previously discussed, wetsuits insulate by way of tiny air bubbles trapped in neoprene.  The neoprene and those air bubbles are positively buoyant.  It’s the main reason we need to add lead to our scuba kits to dive.  Since the wetsuit doesn’t move around on you, the positive buoyancy doesn’t change based on body position.  It’s fairly uniform and consistent if you stay at the same depth.

The drawback of wetsuit is it changes buoyancy as you change depth.  Those tiny air bubbles compress with the added pressures at depth.  That means your wetsuit will be less positively buoyant the deeper you go.  Your lead doesn’t change though.  That means the deeper you go, you will need a greater volume of air in your BCD to compensate.

Drysuits buoyancy doesn’t change based on depth.  It doesn’t compress.  The air inside it does, however.  This is why a drysuithas a low pressure inflator hose connected to it.  As you descend and the air inside the suit compresses, you can add air until you are back at a comfortable volume.  Since you can always adjust to the same volume of air regardless of depth, your buoyancy characteristics will be the same – regardless of depth.

One key difference worth noting with drysuits is the positive buoyancy does change based on body positioning.  The air inside the drysuit will always go to the part of your body that is closest to the surface.  Maintaining proper diver trim is much more important in a drysuit.  That means if you go head downvertical, your feet will turn into big balloons and hold you in that position (or start pulling you to the surface.  Another important thing to learn in training).  If you go head up vertical, air will bulge at your neck seal and probably start escaping.  When in proper diver trim, it distributes fairly evenly and is very comfortable.

You might notice having air in your boots makes your feet more positively buoyant than wetsuit boots.  Many drysuit divers use fins that are negatively buoyant or very small ankle weights (1 pound or less) to compensate.


Redundancy

This one is pretty straightforward but not something divers really think about.  What do you do if your BCD fails?  If it rips or gets punctured during a dive and you can’t inflate it.  If it happens at 90 ft, your wetsuit is so compressed that you’re probably about 10 pounds negative.  How will you safely get back to the surface?  Since a drysuit inflates with air just like a BCD, it’s a redundant system that improves safety.  You have 2 ways to control your buoyancy.  If your dysuit fails, you can use your BCD and vice versa.


24759509-15A2-4F88-9BAA-DB7D76E54168Cost

This is usually the number 1 factor that divers consider when deciding whether to purchase a drysuit or wetsuit.  If you have read the entire article up to this point, you can probably tell that I have a high opinion of drysuits and consider them well worth the investment.  With that said, let’s break down how much they really cost.

Wetsuits will generally cost somewhere between $300-600 new depending on quality.  Depending on quality, they are expected to last approximately 100 dives before they really start to break down.  By break down, I mean tearing at the seams and compression.  Every time a wetsuit gets used, it gets compressed a little more.  After about 100 dives, your 7mm wetsuit is probably closer to a 6mm or 5mm.  Depending on how gentle you are, zippers are only expected to last that long.


You can try to extend the life of your wetsuit by being careful with the zipper every dive or replacing it for about $100.  You can purchase a hooded vest for about $50-150 or an insulating skin suit for about $125-200 to compensate for the compression.  You can buy some water resistant sealant for about $10-15 to patch up the seals or holes.  These are all just band-aid short term solutions.  You’re going to have to get a new wetsuit to replace your old one.

Drysuits very widely based on what material they’re made out of (which will be discussed further in a future post), quality, brand, seals, and extras (pee zipper, pee valve, etc).  They can run anywhere between $1,500 and $3,500.  Although, with some basic upkeep, they are going to last well beyond 100 dives.

If you wax the zippers regularly ($8 for a tube that’ll last a good long while), they will perform for many dives.  I have 3 drysuitswith about 200 dives each.  I have had to replace the zipper on one of them, but I bought it used with an unknown number of dives before me.  The other two are still performing perfectly.  A zipper replacement will run about $150.

With those same drysuits, I have only had 1 seal tear.  The cost and difficulty of replacing will depend on what kind of seals you have.  If you have glued in latex, you’ll have to send it in for replacement.  You’re looking at about $150 for both wrists and about $100 for the neck.  If you have self replacing seals, you can keep those in your save a dive kit and swap them out on site.  For silicone, that’ll run about $60 for a neck seal and $45 for a wrist seal. Some drysuits have seals more unique to their brand, like the DUI latex zipper seals.  Those are a little more expensive, but still less than sending it in.

Depending on what kind of material your drysuit is made of will decide how durable it is.  For example, Cordura will be more resistant to punctures than Bi-lam.  Our Cordura drysuit has about 200 dives and has shown no signs of developing any leaks from wear and tear.  Another drysuit I have with soft socks instead of built in boots has rubbed a little too much from sand getting in the rock boot.  My socks started getting a little wet after about 100 dives.  This was more manufacturer poor design than anything else, which plays an important role when you’re looking to purchase a drysuit.  Regardless of what it’s made of, you should be able to locate and patch minor leaks with some very affordable water resistant sealant, like Aquaseal (about $10-15).  If you cause something more major, you can send it in for repairs.  Depending on how bad it is, you’ll probably spend a few hundred dollars.

These repairs are few and far between if you take care of your drysuit.  With simple upkeep and infrequent repairs, a drysuitcan last your entire diving career.  If you dive regularly, it pays for itself fairly quick when compared to the cost of regularly replacing a wetsuit.  As you’ve probably gathered though, it’s much more than that.  It’s an investment into your own comfort and safety while diving.

-Article written by Jake Fitzgerald of Jade Scuba Adventures.

Morning and Night Dives at Shaw’s Cove Delivers!

Think of the dive you saw all sorts of cool stuff. Well, that was Shaw’s Cove on 27 August for our night dive. A close friend of the owners, Joe, is in town and wants to dive as much as possible, so we are happy to oblige. That meant an early morning dive at Shaw’s Cove and then, because the conditions were so incredible, a night dive as well. So, here’s a few photos and some info about our dives.

Day dive:         Entry at 0730          Dive time: 58 minutes              Max depth 25′

Surf conditions: 1-1.5′          visibility: 20′-30′

surge: limited, slightly more in the shoot-throughs

Nudis and bugs! We only made it 30-40′ into the shoot-through as we kept getting side tracked by nudibranch. At the entrance, we found multiple Hopkin’s Rose nudibranch and quickly found a tiny Porter’s Chromodoris as well. As we moved a few inches, we found some very large California Blue Dorids. Look into the side crevices and you could find California spiny lobsters crawling over each other! big and small bugs everywhere! As we were looking at the sulfur sponge on the right side of the shoot-through, we found two Yellow Umbrella Slugs camouflaging with the sponge.  Needless to say, we spent the dive going back and forth between the sides looking at nudibranch. As we left the shoot-through to return to the beach, Ashley spotted the creature Joe wanted to see: an angel shark! This was the first angel shark Joe had seen, and first for Ashley and Jake at Shaw’s Cove as well.  What an incredible way to end a dive!

This slideshow requires JavaScript.

So, must do night dive conditions they were, so we headed back out and went in at dusk.

Entry: 1911         Dive time: 75 minutes               Max depth 27′

surf conditions: 1′            visibility: 20-30′

surge: limited, slightly more in shoot-throughs

Incredible dive. Conditions were amazing, so shoot-throughs at night were the name of the game. Bugs everywhere. Look in the crevices, and just like the day the Lobsters were crawling all over each other-big and small bugs. So many fish as well. As we swam into the crevice, the nudis had gone to bed. We found two Porter’s Chromodoris during the dive, and one Spanish Shawl at the end of the dive. As we continued through the shoot-through, the vis was amazing and we found multiple California and Stone Scorpionfish, a handful of California Moray Eels with the shrimp friends (have not identified the species of shrimp yet), and a few large Two Spotted Octopus out hunting as well. As we fast forward to the last ten minutes of the dive, we had a Harbor Seal use our lights to hunt-chase garibaldi. He spent 10 minutes nearly knocking us out of the way so he could get to his food. Then, a shovelnose guitarfish swam into our view followed quickly by a large horned shark and another Octopus on the hunt.  On our surface swim back, the harbor seal was still using our lights to hunt and popped up several times.  At one point, I was confused thinking there was a fourth diver in our group only to realize it was the harbor seal!

This slideshow requires JavaScript.

Needless to say, this was the best day of diving Shaw’s Cove has produced!

Anacapa Island Diving

Did we mention that our professionals love to go out diving – just for the fun of diving and exploration? Well, our staff closed shop for the day on Saturday, 30 June 2018 and did exactly that! We took a day to head north and dive off the Spectre Dive Boat out of Ventura, CA.

Enough about us, you want to hear about the dive.

Date: 30 June 2018

Time: 0903 PST (First entry), #2 1113 PST, #3 1327 PST

Location: Anacapa Island: #1: Cathedral Cove, #2 Canyons, #3 Garden Spot

Max Depth: #1 29′, #2 32′, #3 41′

Dive time: #1 64 min, #2 70 min, #3 61 min

About the dives: Spanish Shawl were everywhere! Dive 1 had a group of Porter’s Chromodoris hanging out on a rock. The reefs were teaming with life and thick with kelp. The kelp here was so thick you had to be slow in your motions to not get caught. Even with that, we all untangled a fin or two of each other throughout each dive. Dive #2 had a Hopkin’s Rose and Spanish Shawl nudibranch everywhere you turned. Dive #3 had a Striped Sea Hare blending in well with the rocky reef around it-it was a splotched, lighter color brown than we normally see around the Laguna Beach area. Oh yeah, and plenty of Spanish Shawl everywhere. Dive 1 offered a very playful California Sea Lion to play with us as we were heading back into the boat for the max dive time 60 min the boat crew requested. Dive 2 offered a pair of playful Harbor Seals taste testing our fins. Soon as you looked at them, they swam off. The Harbor Seals were much more shy than the California sea lions. Dive #3 offered a significant current until you get into the kelp. As it was not a drift dive, you had to swim hard to get through the current into the protection of the kelp. Once in the kelp, the current subsided significantly and you could hang out and observe the reef closely.

The marine life we saw: California sheephead (terminal and initial), California spiny lobster, kelp bass, garibaldi, blacksmith, rock wrasse (terminal and initial), seniorita, harbor seal, California sea lion, striped sea hare, Spanish shawl, Hopkin’s Rose, Porter’s chromodoris, smooth turban snail, blue banded goby, black eyed goby, barracuda?, black perch, kelp perch, shiner perch, halfmoon, opaleye, horned shark, giant sea bass, striped perch, Coronado sea urchin, purple sea urchin, rock scallop, California cone snail, warty sea cucumbers, giant green anemone, proliferating anemone, tube anemone, fluted bryozoan, scaled wormshell, kellet’s whelk, manacled sculpin, island kelpfish, two spotted octopus.

Photos by Joe Head, Vladimir Kovacevic, and Ashley Arnold